- STMTXT2211DCR_P#STMTXT2211DCR
Out Of Stock
PLAN PURCHASE REQUIRED
PLAN PURCHASE REQUIRED
Out Of Stock
Approved For {{smartPay-price}}/mo #term Monthly payments
price is dollar #priceDollar and #priceCent centsWas priced at #listPriceDollar dollars and #listPriceCent cents now priced at #priceDollar dollars and #priceCent cents
Retail Price
 smart pay
This item is for pre-order only.
Ships by release date
Choose payment option
Are you new to Straight Talk?

You can turn select phones into a Wi-Fi® hotspot, allowing your Wi-Fi enabled devices to connect to the internet using your mobile data connection. To enable this feature from the main screen, follow these steps:
- If Wi-Fi is enabled on your phone, turn it off by sliding the status bar down from the main screen. Tap the "Wi-Fi" icon to turn it off, then return to the Home screen.
- From the main screen, locate and tap the "Settings" icon.
- If necessary, tap "Connections" or "Network & internet."
- Tap "Hotspot & Tethering," "Mobile Hotspot and tethering," or "Tethering."
- Locate and tap "Mobile Hotspot" or "Wi-Fi Hotspot."
- Tap the slider at the top of the screen to turn this feature "On."
- Instructions for connecting other devices to your hotspot will display on your screen, including the network name and password. You will now be able to connect your devices to this network just as you would any Wi-Fi network.
To change the network name or password, follow these steps:
- Tap the appropriate text field and enter the desired network name or password.
- Note: Changing the password will disconnect any users currently connected to your personal hotspot.
- Tap "Save."
For more information, click here.
Call Forwarding is only available in select areas and on select handsets, your options may vary.
To set up Call Forwarding on your device, follow one of the options below:
OPTION 1
- From the main screen, tap the "Phone" icon.
- Tap the "Menu" icon, indicated by three vertical dots.
- Tap "Settings."
- Tap "Calls."
- Tap "Call forwarding."
- Tap the desired call forwarding option. Enter 1, followed by the area code and phone number where you would like to have your calls forwarded. Tap "TURN ON."
- Note: If there is a phone number in the number field, delete the number and replace it with the desired forwarding number. Then, tap "TURN ON" or "UPDATE."
- To disable Call forwarding, follow steps 1–5. Tap the desired call forwarding option. Then, tap "TURN OFF." Call Forwarding is now disabled, and you will receive all incoming calls on this handset.
OPTION 2
- From the main screen, tap the "Phone" icon.
- If necessary, tap the "Dial pad" icon. To enable Call Forwarding, dial *72, followed by the area code and phone number where you would like your calls forwarded.
- Tap the "Call" icon. You will hear a confirmation beep. All calls will now be forwarded automatically, and you will not receive them on this handset until Call Forwarding is disabled.
- To disable Call Forwarding, dial *73.
- Tap the "Call" icon. You will hear a confirmation beep. Call Forwarding is now disabled, and you will receive all incoming calls on this handset.
For more information, click here.
The security options available for your phone include the following:
- Find My Device
- Screen lock
- Fingerprint
- Face unlock
- Smart Lock
- SIM CARD LOCK
For more information, click here.
To connect your phone to a Wi-Fi® network, follow these steps:
- From the main screen, slide the screen up to display your apps.
- Locate and tap the "Settings" icon.
- Tap "Wi-Fi." (Or, if necessary, tap "Network & internet." Then, tap "Wi-Fi.")
- If necessary, tap the slider to turn Wi-Fi on.
- A list of the available Wi-Fi networks will populate the screen. Tap the desired network.
- If necessary, enter the network password and tap "Connect" (or "CONNECT") or the "Check mark" key.
For more information, click here.
Google's "Find My Device" feature is automatically enabled when you sign in to your Google (Gmail) account on your phone. To use "Find My Device" for a lost or stolen phone, follow these steps:
- From the main screen, slide the screen up.
- Locate and tap the "Settings" icon.
- Locate and tap "Google."
- Tap "Find My Device."
- Tap the desired option to locate your phone, then follow the prompts on your screen.
For more information, click here.
What's in the box?
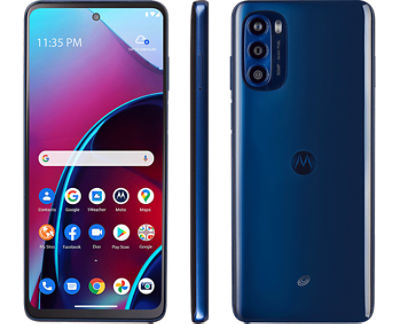
Includes moto g stylus Reconditioned
Charger
USB Type-C cable
Guides
SIM tool.

More Features
Android™ 11 with easy access to the Google apps you use most.
Run a powerful octa-core processor backed by 4GB of RAM, giving you all the speed you need for graphics-intensive games and livestreams. Plus 128GB of storage - expandable up to 512GB with microSD card.
Showcase your creativity from every perspective with the versatile 50MP camera system.
The 5000mAh battery is designed to last up to two days on a single charge.
The 6.8'' Max Vision FHD+ display stretches from edge to edge for an ultra-wide view.
{{itemname}}
{{prop1}}
{{prop2}}
{{itemprice}} [x{{itemquantity}}]
{{itemname}}
{{prop1}}
{{prop2}}
{{itemprice}}

