- STSAG970U1CR_P#STSAG970U1CR
Out Of Stock
PLAN PURCHASE REQUIRED.
PLAN PURCHASE REQUIRED.
Out Of Stock
Approved For {{smartPay-price}}/mo #term Monthly payments
price is dollar #priceDollar and #priceCent centsWas priced at #listPriceDollar dollars and #listPriceCent cents now priced at #priceDollar dollars and #priceCent cents
Retail Price

This item is for pre-order only.
Ships by release date
Choose payment option
Are you new to Straight Talk?

If you are activating your phone for the first time, you will see a prompt to either add an existing Google account or create a new one. Follow the instructions that appear on the screen to set up your account.
If you have set up your phone without activating a Google account, you can add an account at any time. To add a Google account, follow these steps:
- From the main screen, slide the screen up to display your apps.
- Tap the "Gmail" icon.
- Tap "GOT IT" to continue.
- Tap "Add an email address."
- Tap "Google" as your email provider.
- Tap the "Email or phone" field to add an existing account. Then, follow the prompts on your screen.
- To create an account, tap "Create account." Then, follow the prompts on your screen.
For more information, click here.
While not completely necessary, the benefits of adding a Gmail or Google account to your device include the following:
- Automatic backup of device data
- Access to the Google Play Store
- Access to Gmail email account
- Access to Google Drive
- Access to Google Calendar
- Saved locations in Google Maps
- Improved location accuracy for apps
- "Find My Device" security feature
For more information, click here.
By default, your phone is set to automatically choose the best available network. If your phone is not connected to a network, you may be in an area where service is not yet available or you may also be in an area with poor wireless coverage.
If you are indoors, try moving closer to a window or the perimeter of the building, or try going outside.
If changing your location does not solve your problem, try restarting your phone by turning it off and then on again.
NOTE: Not all Networks or Network Services are available on all devices or in all areas.
To verify your network, follow these steps:
NOTE: You must temporarily turn your Wi-Fi Connection to "Off."
- From the main screen, slide the screen up to display your apps.
- Locate and tap the "Settings" icon.
- Locate and tap "About phone."
- Tap "SIM status" or "Status information."
- Then, tap "SIM card status."
- Look under
- "Mobile network state" for your current network state.
- "Mobile voice network type" for your current network type.
SAMSUNG DEVICES
To verify your network settings, follow these steps
- From the main screen, slide the screen up to display your apps.
- Locate and tap the "Settings" icon.
- Tap "Connections."
- Tap "Mobile networks."
- Tap "Network operators", the "Automatic" mode should be selected.
OTHER ANDROID DEVICES
To verify your network settings, follow these steps
- From the main screen, slide the screen up to display your apps.
- Locate and tap the "Settings" icon.
- Tap "Network" or "Network & internet."
- Tap "Mobile network."
- If necessary, tap "Advanced" to view additional options.
- Under "Network" or "Networker Operator," the "Automatically select network" option should be switched to "On."
For more information, click here.
Bixby is Samsung's digital assistant platform that learns from the way you use your phone, and helps you perform a number of tasks that include the following:
- Manage appointments
- Update your phone settings
- Explain various features on your phone
- Translate spoken and written language
- Shop online
- Recognize locations and landmarks
- Streamline daily routines
For more information, click here.
The Federal Communications Commission (FCC) defines Hearing Aid Compatibility (HAC) for wireless devices in terms of radio-frequency (RF) emissions and telecoil coupling. Cell phones are tested to see if they comply with the FCC's definition of hearing aid compatibility.
"M" refers to the RF emissions level of the handset device, and means the device is intended for use with hearing aids in microphone mode. The higher the "M" rating number on the device, the more likely the device can be used with a hearing aid on the microphone setting.
"T" refers to the device's telecoil coupling ability, and means the device is intended for use with hearing aids in telecoil mode. The higher the "T" rating number on the device, the more likely the device can be used with a hearing aid on the telecoil setting. A telecoil is a small device that is built into some hearing aids for use with the telephone as well as assistive listening devices. To use the telecoil, generally either the hearing aid is switched to the "T" position or a button on the hearing aid is pushed to select the telecoil program. Some newer hearing aids will automatically switch to telecoil mode when using a phone. The telecoil picks up magnetic fields generated by telephones and converts these fields into sound. Telecoils are particularly useful for telephone communication because they permit the volume control of a hearing aid to be turned up without creating feedback or "whistling," and background noise can be reduced especially when using cell phones in noisy places. A hearing health professional can determine whether a hearing aid contains a telecoil and how it is activated.
Here is more information on FCC HAC rules.
For more information, click here.
What's in the box?
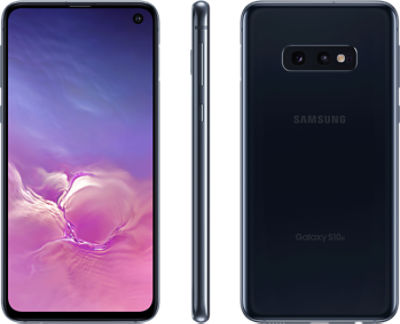
Samsung Galaxy S10e Prism Reconditioned Device
Ejection Pin
USB Connector (OTG)
Quick Start Guide

More Features
Laptop storage without the laptop - Scalable memory that grows with you. 6GB RAM with 128GB internal storage.
Selfie camera Single - 10 MP, f/1.9, 26mm (wide)
A processor one step ahead so it won't slow you down - Qualcomm Snapdragon 855
Android 9.0 (Pie); One UI
{{itemname}}
{{prop1}}
{{prop2}}
{{itemprice}} [x{{itemquantity}}]
{{itemname}}
{{prop1}}
{{prop2}}
{{itemprice}}

